Nextelco:ASA basics
From its-wiki.no
Contents
Basic ASA configuration
In this section we will describe how to save ASA's actual configuration, how to erase configuration and how to make the initial configuration.
Save actual configuration
In order to save the actual configuration, we need to connect to ASA through console port and run the following commands.
NexTelCoASA>
NexTelCoASA>enable
Password:
NexTelCoASA#configure terminal
NexTelCoASA(config)#
NexTelCoASA(config)#copy startup-config disk0:
Destination filename [startup-config]?NexTelCoASA_startup-config_20140522
NexTelCoASA(config)#copy running-config disk0:
Destination filename [startup-config]?NexTelCoASA_running-config_20140522
These are the necessary steps to save the actual and startup configuration into the device flash disk.
Erase configuration & load the correct boot image
These steps are used to erase the actual configuration and reload the device. Remember that ASA by default starts with the oldest software image.
NexTelCoASA(config)#write erase
Erase configuration in flash memory? [confirm]
NexTelCoASA(config)#reload
System config has been modified. Save? [Y]es/[N]o:N
Proceed with reload? [confirm]
...
Pre-configure Firewall now through interactive prompts [yes]? No
If in our flash memory we have a newer software version is a good idea to change it.
ciscoasa>enable
Password:
ciscoasa#configure terminal
ciscoasa(config)#boot system disk0:/asa805-k8.bin
ciscoasa(config)#asdm image disk0:/asdm-623.bin
ciscoasa(config)#write memory
ciscoasa(config)#reload
Proceed with reload? [confirm]
Initial configuration
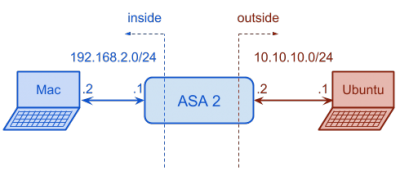
In the following Figure we can see which kind of configuration would we like to set up.
Let start with the configuration.
- The first step is to connect though console cable and set up its name, VLANs and interfaces. In order to be able to connect remotely, it is a good recommendation to set up ssh connection.
ciscoasa>enable
Password:
ciscoasa#configure terminal
ciscoasa(config)#hostname ASA2
ASA2(config)#interface vlan 1
ASA2(config)#ip address 192.168.2.1 255.255.255.0
ASA2(config)#nameif inside
INFO: Security level for "inside" set to 100 by default.
ASA2(config-if)#interface vlan 2
ASA2(config-if)#ip address 10.10.10.2 255.255.255.0
ASA2(config-if)#nameif outside
INFO: Security level for "inside" set to 0 by default.
ASA2(config-if)#exit
ASA2(config)#interface ethernet0/0
ASA2(config-if)#switchport access vlan 2
ASA2(config-if)#no shutdown
ASA2(config-if)#exit
ASA2(config)#interface ethernet0/1
ASA2(config-if)#no shutdown
ASA2(config-if)#exit
ASA2(config)#crypto key generate rsa modulus 2048
WARNING: You have a RSA keypair already defined name <Default-RSA-Key>.
Do you really want to replace them? [yes/no]: yes
Keypair generation process begin. Please wait...
ASA2(config)#aaa authentication ssh console LOCAL
ASA2(config)#ssh 192.168.2.0 255.255.255.0 inside
Return to Phase 1 page.
