DigI:Establish InfoSpot
From its-wiki.no
| Digital Inclusion (DigI) | |||||||
|---|---|---|---|---|---|---|---|
|
Establishing an Information Spot
Contents
Our vision is that every village shall have at least one village information spot. Everyone can visit this information spot and get free access to text, pictures and local video, e.g. health, education and entrepreneurial courses. An example of an information spot focussing on digital health is here.
This document explains how to prepare for a new site with an information spot. You need
- a smart phone allowing your to analyse the available Network operators
- a network utility to determine the strength of the mobile network, e.g. network cell analyser lite (Network Cell Info on Google Play)
Based on these measurements, you can then inform us and invite for partnership in creating an information spot.
The specific information which is needed includes:
- location (GPS), Map
- List of operators with networks
- Network cell info, with location of masts
Overview
See if we have a mobile operator providing mobile broadband somewhere in the area. There are some tricks on how to get a network, even though you can’t get any network from your mobile phone. All operators send a kind of “pilot signal” indicating that there is a network. However, in order to connect to the network the real signal has to be much stronger.
The following steps are explained in the document:
- measure the available networks from the operators
- identify the direction of closest tower
- measure field strength and technology
- create a map with buildings and distances
- purchase and configure the infrastructure
- installation on the site
Before you go out into the field, install a network analyser, e.g. Network Cell Info Lite (download from Google Play)
Note: this guide is made for Android 8.0. Functionality might look different
1. Measure the available networks from the operators
Open your Android phone
- Goto Settings
- Select Network & Internet
- Select Mobile Network
- Select Network Operators
- Search Networks. It will take some minutes to show all networks.
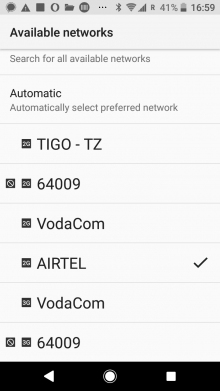
Figure 1 shows the result of the Network Search, showing a total of 6 operators, the top 4 offering a 2G network are Tigo, 64009 (which is Halotel), Vodacom and Airtel. In addition, Vodacom and 64009 (Halotel) offer a 3G network. The normal ranking is after the strength of the mobile network, pointing out that the 3G networks are weaker than the 2G networks.
Please make a screenshot of the results of the network search.
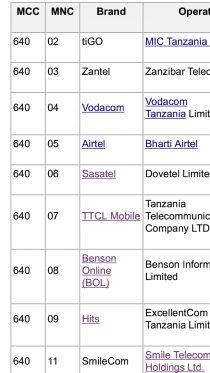
Note: The operator code is put together from the mobile country code (MCC, here: 640 for Tanzania) and the mobile network operators (MNC, here 02 Tigo - 09 Hits=Halotel). See Wikipedia Mobile Country Code (MCC),and Mobile Network Codes (MNC).
Please create a Screenshot similar to Figure 1.
2. Put your phone in 3G (4G) modus
Note: your phone jumps to the best network. Thus, if you have a good 2G (GSM) network and a week 3G (UMTS) network, your phone will report from the 2G network. Thus, you need to fix your phone to the 3G (or 4G) network.
Open your Android phone
- Goto Settings
- Select Network & Internet
- Select Mobile Network
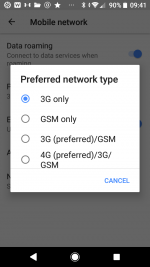
- Select Preferred network type
- Select 3G only (or 4G only). Now your phone is set to use 3G only, providing us with stable 3G measurements.
3. Measure field strength
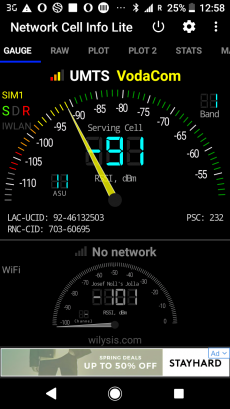
- Open Network Cell Info Lite (or a similar app) on your Android phone. You'll see the following screens
- Gauge: gives you the current field strength, here: -91 dBm from VodaCom using the UMTS (3G) network
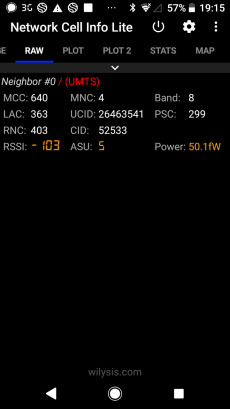
- Raw: provides more info (see Figure 1), needed to analyse the mobile networks with neighbouring antennas. Here you see that we have the Network in Tanzania (MCC=640), operator (MCU=4) and some more technical details
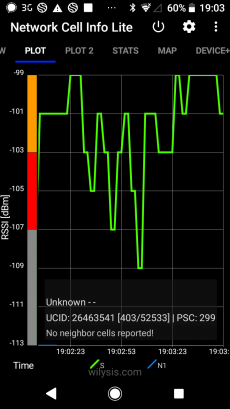
- Plot: used to see the variation of the field strength. Through PLOT we can measure the direction to the tower:. Hold the phone in front of your breast (ca 20-30 cm distance), and slowly turn around 360 deg. In the diagram you'll see that we reached twice the peak of -99 dBm, and in the opposite direction the field strength went down to -109 dBm.
Please make a screenshot of all these screens (Fig. 3 - 5), and indicate in which direction your mobile tower stands.
In our example from Izazi, where all the measurements were done, we see that we have an "orange" signal, and in certain directions a red signal. These measures were performed while standing on a roof of a car, and demonstrate that a person on the ground will not be able to connect to a 3G network, because the field strength is too low. But, using a) a pole and b) a directive antenna helps us to get sufficient signal to reach the Internet.
4. create a map with buildings and distances
Before you go to the field, please identify already where the buildings are
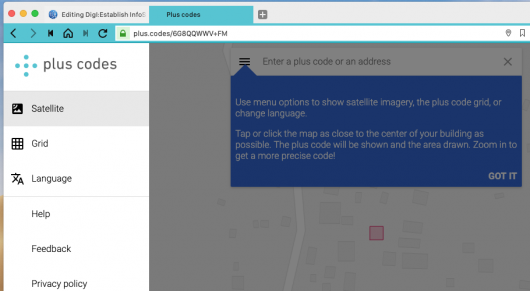
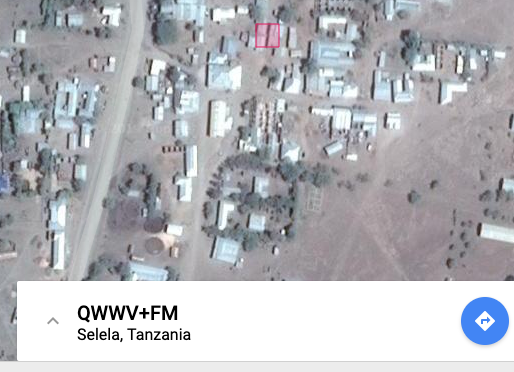
- In a browser, open http://plus.codes/map and click on the 3 horizontal bars to select the satellite view
- identify the houses to be connected, and write down the "Plus Code address". Alternatively, make a screenshot
5. purchase and configure the infrastructure
Examples on how we set up the Information Spots are described in Solutions.
Start the configuration based on BasicInternet:InfoSpot_configuration and scroll down to the bottom to see the details of antenna, LNCC, RPI configuration.
6. Installation on the site
We will then configure the equipment, ship it to you, such that you can install it. See our example from Izazi, where it took us 90 min to:
- mount the antenna on an iron pole of 6 m,
- raise the pole, and point towards the tower (that is why need to know the direction of the tower)
- connect the Wifi-spot (the local network control centre LNCC)
- connect the Village server on port 2 of the Wifi-spot

